Firearms for self-protection after a disaster

I have not seen any of the mainstream preparedness information resources discuss the effectiveness of firearms for self-protection after a major disaster. Usually it is left to the niche survivalist sites to tackle. Perhaps the subject is too politically sensitive for large organizations. Generally, the focus is simply on stocking up on supplies, making a plan and then taking your lead from 'The Authorities'. Unfortunately, recent examples have shown that for some time after a disaster, the authorities are often nowhere to be seen. Looting and violent crime surge while ordinary people are left to fend for themselves against criminals. After Hurricane Katrina in 2005, New Orleans suffered from widespread looting. Survivors of the Chilean Earthquke of 2010 were forced to form their own local watch group against criminals, arming themselves with makeshift weapons. In Haiti, criminals fought with other earthquake survivors over scarce resources. One Haitian witness said, "All the policemen are busy rescuing and burying their own families. They don't have the time to patrol the streets." Interestingly, the 2011 Earthquake in Japan proved to be an exception. There, the quake victims were orderly, looting was almost non-existent and even the Yakuza enforced order while helping to distribute relief goods.

Post-disaster Manila will not be orderly

Will a post-disaster Manila more resemble Japan or Haiti? It's silly even to pose the question when we have, as a normal occurrence, akyat-bahay (house intruder) gangs who sneak into homes, sometimes killing the occupants for low value items. Of course, there's a place for expecting the best out of your fellow man and people often pull together during adversity. Just don't rely on this happening. It seems likely that desperation will cause more people to use violence on others. In particular, the people who've taken the effort to prepare beforehand may become a target of envy from those who did nothing, or those unfortunate enough to have lost everything. We must accept the fact that people may want to do us harm and there is no tool more effective at repelling them than a firearm in the hands of a trained person. Sticks, pepper-spray, unarmed self-defence and strong words all have their place but only a firearm enables a weaker person to repel several stronger attackers.

Get a gun, learn how to use it

I realize that advocating this is controversial but I would be doing you a great disservice by simply ignoring the topic. If you are at all serious about preparedness, you need to get a gun and learn how to use it. Preparedness includes being ready to protect yourself, your family and your property. There's little point in stocking up on supplies when everything can be taken away by a street thug or desperate mob. Let me be clear, however, that using your firearm against an adversary should obviously be considered the absolute last option; there are many, many things you can do to avoid that situation altogether. Nevertheless, dealing with reality means acknowledging that the danger exists. Some believe that the best way to protect people is to strive for a 'gunless society'. While they are entitled to their point-of-view, these well-meaning people are sadly misguided. A deeper discussion belongs elsewhere so all I will say here is that if a major disaster hits the Philippines, our society will definitely not be gunless. Fortunately, Filipino civilians can legally own firearms and the country has an active sport shooting culture so there are many information sources available. If you are a novice, do yourself a big favor and join a gun club. There you can get more information about training and legally purchasing a firearm. Armscor, Jethro and Stronghand are just a few of the the more popular clubs in Manila.

Types of firearms useful in a disaster

The subject of which types of firearms for a disaster sitauation can, on its own, cover many articles and generate heated debate. I'll just give you a summary of my opinion on the matter. 'Prepper' and survivalist sites, usually US-based, often advocate that you should have three types of firearms: a handgun, a rifle and a shotgun. Their reasoning is that this covers you for the range of uses from concealed carry and home defense to hunting game for food. I don't think this advice quite applies to Manila residents. First of all, the only 'game' you're likely to hunt will probably be disease-ridden rats, cats and dogs. Secondly, the tight confines of our city would mean that the longer range of a rifle may pose a risk to innocent people if you miss your target. (And if someone is at a distance where you'd need a rifle, they're not likely to pose an immediate danger so why would you be shooting at them?) Personally, I believe that the best combination for those of us living in Manila is the handgun and shotgun. A handgun can be kept with you at all times and easily concealed so as not to cause alarm. The shotgun provides more power while being reasonably priced and versatile. Shotgun shells are also widely available and cheaper than rifle ammunition.
Shotgun and pistol with ammunition
Firearms for home protection after a disaster: Mossberg 500 with a variety of loads, Springfield XD 45 and Ruger LCP pistols
Many Filipino preppers, like their American counterparts, are also fans of what are classed in the Philippines as 'high powered rifles' (HPRs). Examples of these include the AR-15, M4 (technically a carbine) or AK-47. Some tend to look down on the shotgun as an inferior cousin and believe that you must have a HPR for any serious civil unrest situation. If your situation allows you the opportunity to own a carbine or high-powered rifle, great; there's nothing wrong with having more tools in your toolbox. However, these are expensive and the sale of HPRs to civilians are restricted. The expense and effort it takes to procure one may be better spent on other areas, like learning first aid or buying food and medical supplies.

Choose what suits your situation

Ultimately you should choose what suits your situation while considering what's most likely to happen. A major earthquake or flood is unlikely to turn Manila into a war zone so stocking up like Rambo may not be the best use of your resources. However, it's prudent to expect a rise in violent crime like looting, hold-ups, rapes and armed home invasions. Also remember that those who are most at risk would be the weaker members of your family such as children, grandparents and especially women. You may not be around to protect them so it's important to ensure that they're capable of protecting themselves. Firearms do this more effectively than any other tool.
Please practice peaceful and responsible firearms ownership Remember to observe the four rules of firearm safety:
  1. Always assume that the gun is loaded.
  2. Never let the muzzle cover anything you are not willing to destroy.
  3. Keep your finger off the trigger until your sights are on the target.
  4. Be sure of your target and what is beyond it.
For more information, please visit progun.ph
Continue Reading

The emergency plan card – an important tool for reuniting your family

Two important parts of your family emergency plan are having an out-of-town contact person and setting meeting points should members be separated during the event. However, you might not be able to recall important telephone numbers and addresses due to high stress. Even if you keep details in a phone or personal organizer, these may be lost, damaged or discharged at the time you need them most. One solution is distribute emergency plan cards amongst your family. These should contain the essential elements of your plan and be kept with them at all times. Feel free to use the PrepareManila.org Emergency Plan Card template which you can find in the Resources section. Go ahead and download, print and give copies to all your friends and family.

How to use the emergency plan card

I've kept the template simple and fairly free-form so you can customize it to suit your own plan. Simply cut it out and fold down the middle to create a small business card-sized booklet. The front page should contain your out-of-town contact telephone numbers and meeting place locations. The back can contain special notes about the plan itself. There will be a blank space for the middle pages where you put anything you want, such as reminders, procedures or other important telephone numbers.
Sample Emergency Plan Card
Emergency Plan Card with sample information
Download the Emergency Plan Card template.

A digital emergency plan card for iOS devices

Download Emergency Plan for iPhone on the App Store
Update 10 April 2014: There is now an iPhone app version of a paper-based emergency plan card called Emergency Plan for iPhone. It has an advantage that your phone stays updated as part of your every-day use so is more likely to have your contacts' latest details. Of course, a disadvantage is that it's unusable if your battery is dead but its usefulness is more for the immediate aftermath of a crisis.
A digital emergency plan card: Emergency Plan for iPhone
A digital emergency plan card: Emergency Plan for iPhone (download)
Apple iPhone and iPad users can download it on the App Store. For more details, see the developer's site. Continue Reading

The diaper bag as a baby bug-out bag

A diaper bag is one thing that parents of an infant always bring when out of the home. As part of our preparedness planning, my wife and I decided to upgrade our baby's diaper bag to a fully-fledged bug-out bag. The reason for this is that since we're carrying an extra bag anyway, we might as well include some items needed for a baby's emergency kit. The bag hangs off our stroller so the added weight isn't any real inconvenience. My wife wrote an article on her new blog describing her suggestions for what to put in your baby bug-out bag:
  • A minimum of 20 nappies/diapers or enough to last 3 days. These should be kept in a resealable plastic bag to prevent them from getting dirty or wet.
  • Nappy wipes. This is essential for when there is not enough water to wash with. It's better to save clean water for drinking.
  • Small changing mat
  • At least 3 sets of baby clothes, preferably ones that are small, light and suited for hot Manila weather like sandos (vests). A blanket can be used when the weather becomes cooler (see below).
  • 1 or 2 soft towels/blankets to keep warm in cooler weather, and which are also useful for baby to sleep on
  • 1 small, wide-brimmed cloth hat to protect baby from harsh sunlight
  • 1 baby grooming kit with nail scissors or nail cutters, nail file, thermometer
  • 1 small bottle of ethyl or isoprophyl alcohol
  • 1 foldable travel umbrella to protect against rain or sun
  • Oral rehydration salts, which can be purchased at your local drugstore
  • Large clean plastic bags which can be used to lay down as a hygienic sheet, to carry things, and to protect important belongings from dirt and moisture.
  • Bottles and dry formula milk for bottle fed babies
  • Baby's favourite toy or security blanket. This will help to amuse and lift baby's spirits, which can also provide a much-needed mood boost for us parents.
  • Any special medications or creams your baby may need
Bug out bag contents illustration You can read her article at Bubu and mama: Baby Bug-Out Bag Continue Reading

After a disaster, beware of diarrhea

The aftermath of a disaster can often kill more people than the disaster itself and one of the main risks is disease. Poor sanitation caused by the disruption often leads to outbreaks of acute diarrhea. We saw this during Typhoon Ondoy where diarrhea was one of the top killers in evacuation centers. It was also a huge problem in post-earthquake Haiti when a cholera epidemic infected 1,500 people in just a few days. Even during normal times, diarrhea is the 3rd leading cause of child illness and the 4th leading cause of deaths among children less than 5 years in the Philippines. Diarrhea kills through rapid dehydration and children are especially susceptible as they can succumb in a matter of hours. Nevertheless, deaths can be prevented by simply making sure that the patient drinks a lot of clean water with oral rehydration salts. Unfortunately, these are difficult to find after a disaster. Aid workers in Haiti were distressed to find that many were dying for want of something that costs so little.

Simple ways to safeguard your family

There's no reason why your family should suffer from an outbreak of diarrhea.
  • Stock up on Oral Rehydration Salts. These are available from Watsons and Mercury Drug for around Php10 to Php15 per sachet.
  • Stock up on antidiarrheal medications like Diatabs (Loperamide) which are less than Php30 for four capsules.
  • Make sure you have access to clean water for drinking and washing.
  • Eat cooked food or food washed well in clean water.
  • As much as possible, continue with your usual sanitation habits.
Oral Rehydration Salts and Diatabs

Household alternatives

If you don't have any commercially produced ORS at home, rehydrate.org suggests the following alternatives:
  • Breastmilk
  • Gruels (diluted mixtures of cooked cereals and water)
  • Carrot Soup
  • Rice water (congee)
  • Fresh fruit juice
  • Weak tea
  • Green coconut water (buko juice)
  • A home-made solution of salt, sugar and if possible, orange juice or mashed banana (see link for recipe and instructions)
Remember: make sure you first check with your pediatrician if these alternatives are suitable for your child.

Additional resources

Continue Reading

Observations on emergency lighting options

During Typhoon Ondoy, our condo unit was without electricity for almost three days. Although the building was fitted with backup generators, all power was diverted to essential services like elevators and common area emergency lighting. On the day after power was restored, my wife and I visited Ace Hardware in SM Makati to pick up some supplies and were greeted with a crowd of people panic-buying emergency lighting products. By the time we'd arrived in the early afternoon, Ace Hardware's stock was almost gone. I could only imagine that those poor people had been caught out without lighting during the brown-out and were desperately trying to rectify their mistake. Of course, by then it was too late because Metro Manila had already started to return to normal. Fortunately, we'd stocked up on a wide range of emergency lighting long before so although we still had to deal with the heat, at least it didn't have to be in the dark. The picture below shows a few of our emergency lighting devices. A selection of emergency lighting options 
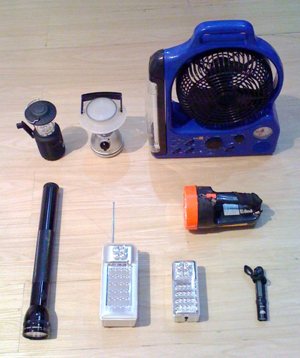
These range from plug-in rechargeables to hand-crank, D-cell, AA-cell and CRE123 powered lights. A few are multi-purpose devices that also include fan, radio, clock and cellphone charger. The lighting elements ranged from incandescent light bulb, LED and CFL.

What I learned

  1. Don't wait until the emergency itself to buy your kit. This is so obvious but judging from the crowd in SM Makati's Ace Hardware, many people did just that. Like them, you'll most likely end up scrambling after a dwindling supply.
  2. By far the most useful technology combination for area lighting turned out to be LED lights with plug-in rechargeable power source. (In the picture, these are the white box-shaped lamps made by Akari and Omni). They were labelled to last between 20 to 120 hours on a single charge and they kept going throughout the three-day power cut.
  3. For spot lighting, an LED flashlight with CRE123 battery turned out to be the most convenient. (This is the small black flashlight in the picture, a Fenix PD30.) It provided a very bright light with long running time in a tiny package.
  4. The CFL lights were pretty much useless for anything more than a short-term brown-out; although they cast the most pleasant ambient light, they only lasted a few hours before giving up.
  5. I didn't bother with the hand-crank light at all. Perhaps it would have been useful in the most desperate case when all other lighting options were exhausted. In this case, I had many other better options.
  6. The cellphone charge feature on one unit turned out to be very useful.
  7. The incandescent bulb lamps were far outclassed by all other LED units. With the low price and ready availability of LEDs, I don't think there's any compelling reason to buy an incandescent bulb flashlight or lamp.
Of all the models, the one that most suited the purpose of emergency light was the Akari Rechargeable Emergency Light (model AEL 969) which I bought for approx. Php1,100 at Office Warehouse. This included an AM/FM radio, mobile charger and allowed to you switch from four LED (120 hour run time) to 28 LED (50 hour run time). A few weeks after Typhoon Ondoy, I tested the unit again as I was curious to see how long it would last on a full charge. It ran for almost 5 days before discharging. I've been told that in emergencies, it's best to have a light that uses a common power source, such as standard C-cell or AA-cell batteries. The reasoning behind this is that their batteries can be stored for longer and it's easier to find replacements; proprietary rechargeable power packs, on the other-hand, need maintenance and are heavily dependent on a power supply to keep them charged. I do generally agree with this and will always have a few standard flashlights in my kit. However, my experience during Typhoon Ondoy shows that in all but the worst-case scenarios, things would most likely be getting back to normal by the time your rechargeable LED light starts to run down. Continue Reading

Water storage for condo dwellers

Water is always at the top of any disaster preparedness list as it's essential for survival. The generally accepted guideline is to set side 4 liters (1 gallon) of water per person, per day, for drinking and sanitation. Keep in mind that in a tropical country like the Philippines, even the slightest physical exertion is going to leave you dripping with perspiration, thereby causing your body to lose valuable water reserves. While water storage options are readily available, the biggest problem is that they tend to be bulky and need cycling to prevent a build up of harmful bacteria. This can be especially problematic in condo units where space is a premium. Being a condo dweller in Metro Manila with a wife and water-intensive baby, I know first-hand how difficult this can be. The solution I've found is to keep water caches in locations where they have practical every-day use. For example, a plastic jerry can with tap kept by the kitchen sink acts as water storage. Once in a while, we use it for washing dishes before topping up the jerry can with fresh tap water. Plastic jerry cans for water storage 
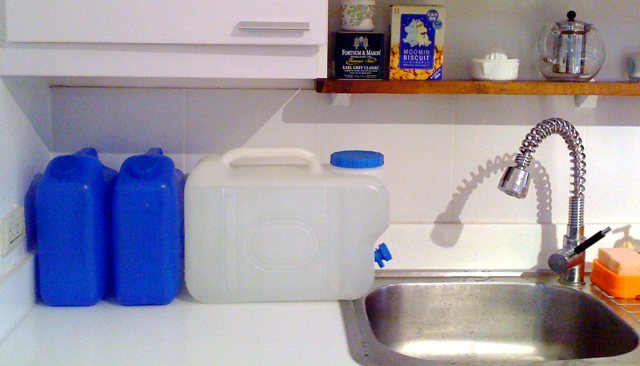
The clear plastic jerry can in the picture above holds 20 liters, which is enough to last one person for around 5 days. The blue plastic jerry cans hold just over 6 liters each. These can be purchased from hardware stores like Ace Hardware and True Value. (The 20 liter can was approximately Php300 and the blue 6 liter cans are Php49.) We also keep additional jerry cans in a cupboard and bottled mineral water in the fridge and pantry, as well as a balde (water bucket) in the shower. In total, I estimate that my wife, baby and I can go almost two weeks just using the stored water in our one-bedroom condo unit.

Note: be sure to store as much of your water as possible at floor level. If stored high up, such as on shelving, movement during an earthquake could cause them to fall. This not only risks injuring someone but also means you lose some of your water reserves. Continue Reading