Common sense items for your Vehicle Emergency Kit

Here’s a list adapted from 13 Common Sense Items you Need in a Winter Vehicle Emergency Kit on ITS Tactical. We don’t have winter but these are some common sense items for the Philippines: First aid kit Jumper Cables A flashlight Jack and lug wrench Spare tire Basic tools Vehicle fire extinguisher Emergency signalling devices Extra food […] Continue Reading

Local version of the Cocoon Grid-It

Are you looking for something similar to the Cocoon Grid-It to organise your EDC items or emergency tools? Here’s something I found in Blade. They have different sizes that sell for between P200 and P400. Continue Reading

Include a document pack in your bug-out-bag

If your home is severely damaged after an earthquake or waterlogged from a flood, all your identity, insurance and asset documents could be lost. Even if your home stays intact, there may not have time to gather these should you have to evacuate for any reason. One often overlooked item of a emergency kit or bug-out-bag is a document pack. This is where you can keep copies of all your important documents, along with contact numbers and photographs of your family. Remember to place these in a waterproof bag. (If possible, they should also be in a fireproof bag but unfortunately, I have not seen these for sale in the Philippines. If anyone knows where these can be purchased, please let me know.)
Image of an emergency document pack for your bug-out-bag
Emergency document pack containing important documents
Example contents for your emergency document pack include:
  • Passports and ID cards
  • Medical history, immunization records and list of medications
  • Photographs of each family member with names
  • Birth, baptismal and marriage certificates
  • Social Security and TIN numbers
  • Property deeds
  • Insurance documents
  • Bank account, financial details and investments
  • Wills and trusts
  • Emergency plan
  • Address and telephone number listing
  • City map and route to your bug-out location
  • Cash in large and small notes
Remember that this pack will contain confidential information. If lost, these could be used for identity theft or fraud. One way to protect against this is to write certain things in code. For example, you can include dummy numbers to obscure your real bank account number or code words for important locations. This way, even if Manila is faced with a complete disaster or catastrophe, you can at least make it easier to rebuild your life. You will have less difficulty proving who you are to the authorities and you'll have a record of your assets. Continue Reading

Emergency cooking in a condo – is your fire kit appropriate?

I'd always been told that it's important for your survival kit to have three ways of making fire. For example, you may have a lighter, matches and flint and steel. All my emergency kits over the years had these and I'd been feeling pretty confident that I was prepared—that is, at least until Typhoon Ondoy. You see, while it was a major calamity for some people, my wife and I live in a condo in Metro Manila so for us, it ended up only being an inconvenience. The power was off and while we couldn't cook using our electric cooker, it was a simple matter to step out to buy food or eat at a restaurant. Breaking out my fire kit to start an open fire in our living room trash can wasn't a realistic option. This made me realize that my preparations in this area were inappropriate for our situation. Our fire kit may have been useful in a total catastrophe where we'd have to make a camp fire in an open space. However, it wasn't right for being holed up in a condo with no power. Our cooking capabilities were limited to two extremes: one in which utilities are working relatively normally or the other where there was a complete breakdown in social order. In reality, as Typhoon Ondoy demonstrated, we are more likely to experience varying degrees of intermediate emergencies. Fortunately, not being able to cook wasn't a major problem at that time as we had other options. Nevertheless, it did get me thinking about what would have happened if the situation had been more serious. I solved this problem by purchasing a portable gas cooker that takes small gas canisters. It allows us to do some basic cooking and sterilization inside our condo unit without posing an unacceptable fire hazard. Furthermore, the unit is small enough to be conveniently packed in a bag should we need to evacuate.
Portable gas cooker and spare canisters for your disaster preparedness kit
Portable gas cooker with carry case and spare canisters
A cooker like the one shown in the image can be purchased from many hardware stores like Ace Hardware and True Value for between Php800 and Php2,000. Spare gas canisters are about Php50 to Php80 depending on size. I've placed a spoon and fork next to the cooker to give you an idea of its size. The lesson here is to avoid blindly following rules-of-thumb when it comes to preparedness. What might work well for another person may be totally inappropriate to your environment and circumstances. Think realistically about how you and your family may respond to emergency scenarios and build your kit around that plan. Also remember to update your plan as your lifestyle changes. As a single person who enjoyed camping as a teenager, my simple fire kit would have been fine for almost any scenario. If things got bad enough, it wouldn't have been a problem to leave my condo for another location and live a little more ruggedly for a while. Now that I'm married and have a baby, this would not be at all desirable. Being equipped with only the bare basics may turn a manageable situation into an arduous challenge at best and life threatening scenario at worst. In conclusion, take a little time to run through a simple review of your current circumstances and make the necessary upgrades to your emergency kit. Continue Reading

The diaper bag as a baby bug-out bag

A diaper bag is one thing that parents of an infant always bring when out of the home. As part of our preparedness planning, my wife and I decided to upgrade our baby's diaper bag to a fully-fledged bug-out bag. The reason for this is that since we're carrying an extra bag anyway, we might as well include some items needed for a baby's emergency kit. The bag hangs off our stroller so the added weight isn't any real inconvenience. My wife wrote an article on her new blog describing her suggestions for what to put in your baby bug-out bag:
  • A minimum of 20 nappies/diapers or enough to last 3 days. These should be kept in a resealable plastic bag to prevent them from getting dirty or wet.
  • Nappy wipes. This is essential for when there is not enough water to wash with. It's better to save clean water for drinking.
  • Small changing mat
  • At least 3 sets of baby clothes, preferably ones that are small, light and suited for hot Manila weather like sandos (vests). A blanket can be used when the weather becomes cooler (see below).
  • 1 or 2 soft towels/blankets to keep warm in cooler weather, and which are also useful for baby to sleep on
  • 1 small, wide-brimmed cloth hat to protect baby from harsh sunlight
  • 1 baby grooming kit with nail scissors or nail cutters, nail file, thermometer
  • 1 small bottle of ethyl or isoprophyl alcohol
  • 1 foldable travel umbrella to protect against rain or sun
  • Oral rehydration salts, which can be purchased at your local drugstore
  • Large clean plastic bags which can be used to lay down as a hygienic sheet, to carry things, and to protect important belongings from dirt and moisture.
  • Bottles and dry formula milk for bottle fed babies
  • Baby's favourite toy or security blanket. This will help to amuse and lift baby's spirits, which can also provide a much-needed mood boost for us parents.
  • Any special medications or creams your baby may need
Bug out bag contents illustration You can read her article at Bubu and mama: Baby Bug-Out Bag Continue Reading

Observations on emergency lighting options

During Typhoon Ondoy, our condo unit was without electricity for almost three days. Although the building was fitted with backup generators, all power was diverted to essential services like elevators and common area emergency lighting. On the day after power was restored, my wife and I visited Ace Hardware in SM Makati to pick up some supplies and were greeted with a crowd of people panic-buying emergency lighting products. By the time we'd arrived in the early afternoon, Ace Hardware's stock was almost gone. I could only imagine that those poor people had been caught out without lighting during the brown-out and were desperately trying to rectify their mistake. Of course, by then it was too late because Metro Manila had already started to return to normal. Fortunately, we'd stocked up on a wide range of emergency lighting long before so although we still had to deal with the heat, at least it didn't have to be in the dark. The picture below shows a few of our emergency lighting devices. A selection of emergency lighting options 
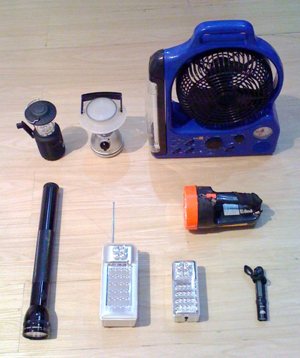
These range from plug-in rechargeables to hand-crank, D-cell, AA-cell and CRE123 powered lights. A few are multi-purpose devices that also include fan, radio, clock and cellphone charger. The lighting elements ranged from incandescent light bulb, LED and CFL.

What I learned

  1. Don't wait until the emergency itself to buy your kit. This is so obvious but judging from the crowd in SM Makati's Ace Hardware, many people did just that. Like them, you'll most likely end up scrambling after a dwindling supply.
  2. By far the most useful technology combination for area lighting turned out to be LED lights with plug-in rechargeable power source. (In the picture, these are the white box-shaped lamps made by Akari and Omni). They were labelled to last between 20 to 120 hours on a single charge and they kept going throughout the three-day power cut.
  3. For spot lighting, an LED flashlight with CRE123 battery turned out to be the most convenient. (This is the small black flashlight in the picture, a Fenix PD30.) It provided a very bright light with long running time in a tiny package.
  4. The CFL lights were pretty much useless for anything more than a short-term brown-out; although they cast the most pleasant ambient light, they only lasted a few hours before giving up.
  5. I didn't bother with the hand-crank light at all. Perhaps it would have been useful in the most desperate case when all other lighting options were exhausted. In this case, I had many other better options.
  6. The cellphone charge feature on one unit turned out to be very useful.
  7. The incandescent bulb lamps were far outclassed by all other LED units. With the low price and ready availability of LEDs, I don't think there's any compelling reason to buy an incandescent bulb flashlight or lamp.
Of all the models, the one that most suited the purpose of emergency light was the Akari Rechargeable Emergency Light (model AEL 969) which I bought for approx. Php1,100 at Office Warehouse. This included an AM/FM radio, mobile charger and allowed to you switch from four LED (120 hour run time) to 28 LED (50 hour run time). A few weeks after Typhoon Ondoy, I tested the unit again as I was curious to see how long it would last on a full charge. It ran for almost 5 days before discharging. I've been told that in emergencies, it's best to have a light that uses a common power source, such as standard C-cell or AA-cell batteries. The reasoning behind this is that their batteries can be stored for longer and it's easier to find replacements; proprietary rechargeable power packs, on the other-hand, need maintenance and are heavily dependent on a power supply to keep them charged. I do generally agree with this and will always have a few standard flashlights in my kit. However, my experience during Typhoon Ondoy shows that in all but the worst-case scenarios, things would most likely be getting back to normal by the time your rechargeable LED light starts to run down. Continue Reading

Water storage for condo dwellers

Water is always at the top of any disaster preparedness list as it's essential for survival. The generally accepted guideline is to set side 4 liters (1 gallon) of water per person, per day, for drinking and sanitation. Keep in mind that in a tropical country like the Philippines, even the slightest physical exertion is going to leave you dripping with perspiration, thereby causing your body to lose valuable water reserves. While water storage options are readily available, the biggest problem is that they tend to be bulky and need cycling to prevent a build up of harmful bacteria. This can be especially problematic in condo units where space is a premium. Being a condo dweller in Metro Manila with a wife and water-intensive baby, I know first-hand how difficult this can be. The solution I've found is to keep water caches in locations where they have practical every-day use. For example, a plastic jerry can with tap kept by the kitchen sink acts as water storage. Once in a while, we use it for washing dishes before topping up the jerry can with fresh tap water. Plastic jerry cans for water storage 
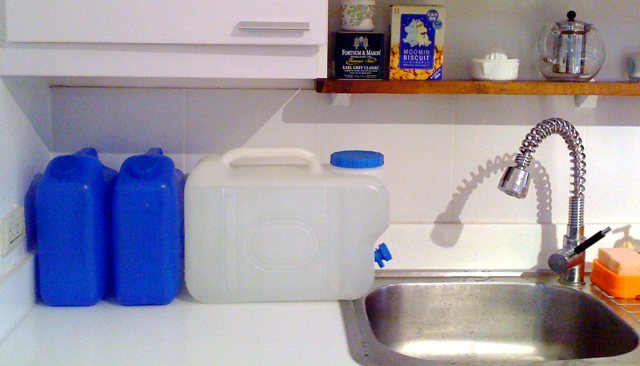
The clear plastic jerry can in the picture above holds 20 liters, which is enough to last one person for around 5 days. The blue plastic jerry cans hold just over 6 liters each. These can be purchased from hardware stores like Ace Hardware and True Value. (The 20 liter can was approximately Php300 and the blue 6 liter cans are Php49.) We also keep additional jerry cans in a cupboard and bottled mineral water in the fridge and pantry, as well as a balde (water bucket) in the shower. In total, I estimate that my wife, baby and I can go almost two weeks just using the stored water in our one-bedroom condo unit.

Note: be sure to store as much of your water as possible at floor level. If stored high up, such as on shelving, movement during an earthquake could cause them to fall. This not only risks injuring someone but also means you lose some of your water reserves. Continue Reading